> ## Documentation Index
> Fetch the complete documentation index at: https://dripart-chore-sync-comfy-api-v2-spec-462120c.mintlify.site/llms.txt
> Use this file to discover all available pages before exploring further.
# Wan ATI ComfyUI Native Workflow Tutorial
> Using trajectory control for video generation.
**ATI (Any Trajectory Instruction)** is a controllable video generation framework proposed by the ByteDance team. ATI is implemented based on Wan2.1 and supports unified control of objects, local regions, and camera motion in videos through arbitrary trajectory instructions.
ATI source code and documentation on GitHub
Visual tool to draw and edit motion trajectories on images
## Key Features
* **Unified Motion Control**: Supports trajectory control for multiple motion types including objects, local regions, and camera movements.
* **Interactive Trajectory Editor**: Visual tool that allows users to freely draw and edit motion trajectories on images.
* **Wan2.1 Compatible**: Based on the official Wan2.1 implementation, compatible with environments and model structures.
* **Rich Visualization Tools**: Supports visualization of input trajectories, output videos, and trajectory overlays.
## WAN ATI Trajectory Control Workflow Example
Make sure your ComfyUI is updated.
* [Download ComfyUI](https://www.comfy.org/download)
* [Update Guide](/installation/update_comfyui)
Workflows in this guide can be found in the [Workflow Templates](/interface/features/template).
If you can't find them in the template, your ComfyUI may be outdated.
If nodes are missing when loading a workflow, possible reasons:
1. You are not using the latest ComfyUI version (Nightly version)
2. Some nodes failed to import at startup
* [Cloud](https://cloud.comfy.org) will update after ComfyUI stable release.
So, if you find any core node missing in this document, it might be because the new core nodes have not yet been released in the latest stable version. Please wait for the next stable release.
### 1. Workflow Download
Update your ComfyUI to the latest version, then download and drag the workflow file into ComfyUI, or find "Wan2.1 ATI" in the Template Library under `Workflow` → `Browse Templates` → `Video`.

Open in Comfy Cloud
Download JSON or search "Wan2.1 ATI" in Template Library
We will use the following image as input:
Download the default input image, or use your own image as the starting frame.
### 2. Manual Model Installation
All models involved in this guide can be found [here](https://huggingface.co/Comfy-Org/Wan_2.1_ComfyUI_repackaged/tree/main/split_files).
**Diffusion Model** : Choose one version:
Wan2.1 I2V ATI 14B diffusion model (fp8 precision). Place in ComfyUI/models/diffusion\_models/
**Text Encoders** : Choose one version:
Full precision text encoder (higher quality, larger size). Place in ComfyUI/models/text\_encoders/
FP8 text encoder (lower VRAM usage). Place in ComfyUI/models/text\_encoders/
**VAE**
Wan2.1 VAE model. Place in ComfyUI/models/vae/
**CLIP Vision**
CLIP Vision model for processing reference images. Place in ComfyUI/models/clip\_vision/
**File Storage Location**
```
📂 ComfyUI/
├── 📂 models/
│ ├── 📂 diffusion_models/
│ │ └── Wan2_1-I2V-ATI-14B_fp8_e4m3fn.safetensors
│ ├── 📂 text_encoders/
│ │ └── umt5_xxl_fp8_e4m3fn_scaled.safetensors # or your chosen version
│ ├── 📂 clip_vision/
│ │ └── clip_vision_h.safetensors
│ └── 📂 vae/
│ └── wan_2.1_vae.safetensors
```
### 3. Complete the Workflow Execution Step by Step
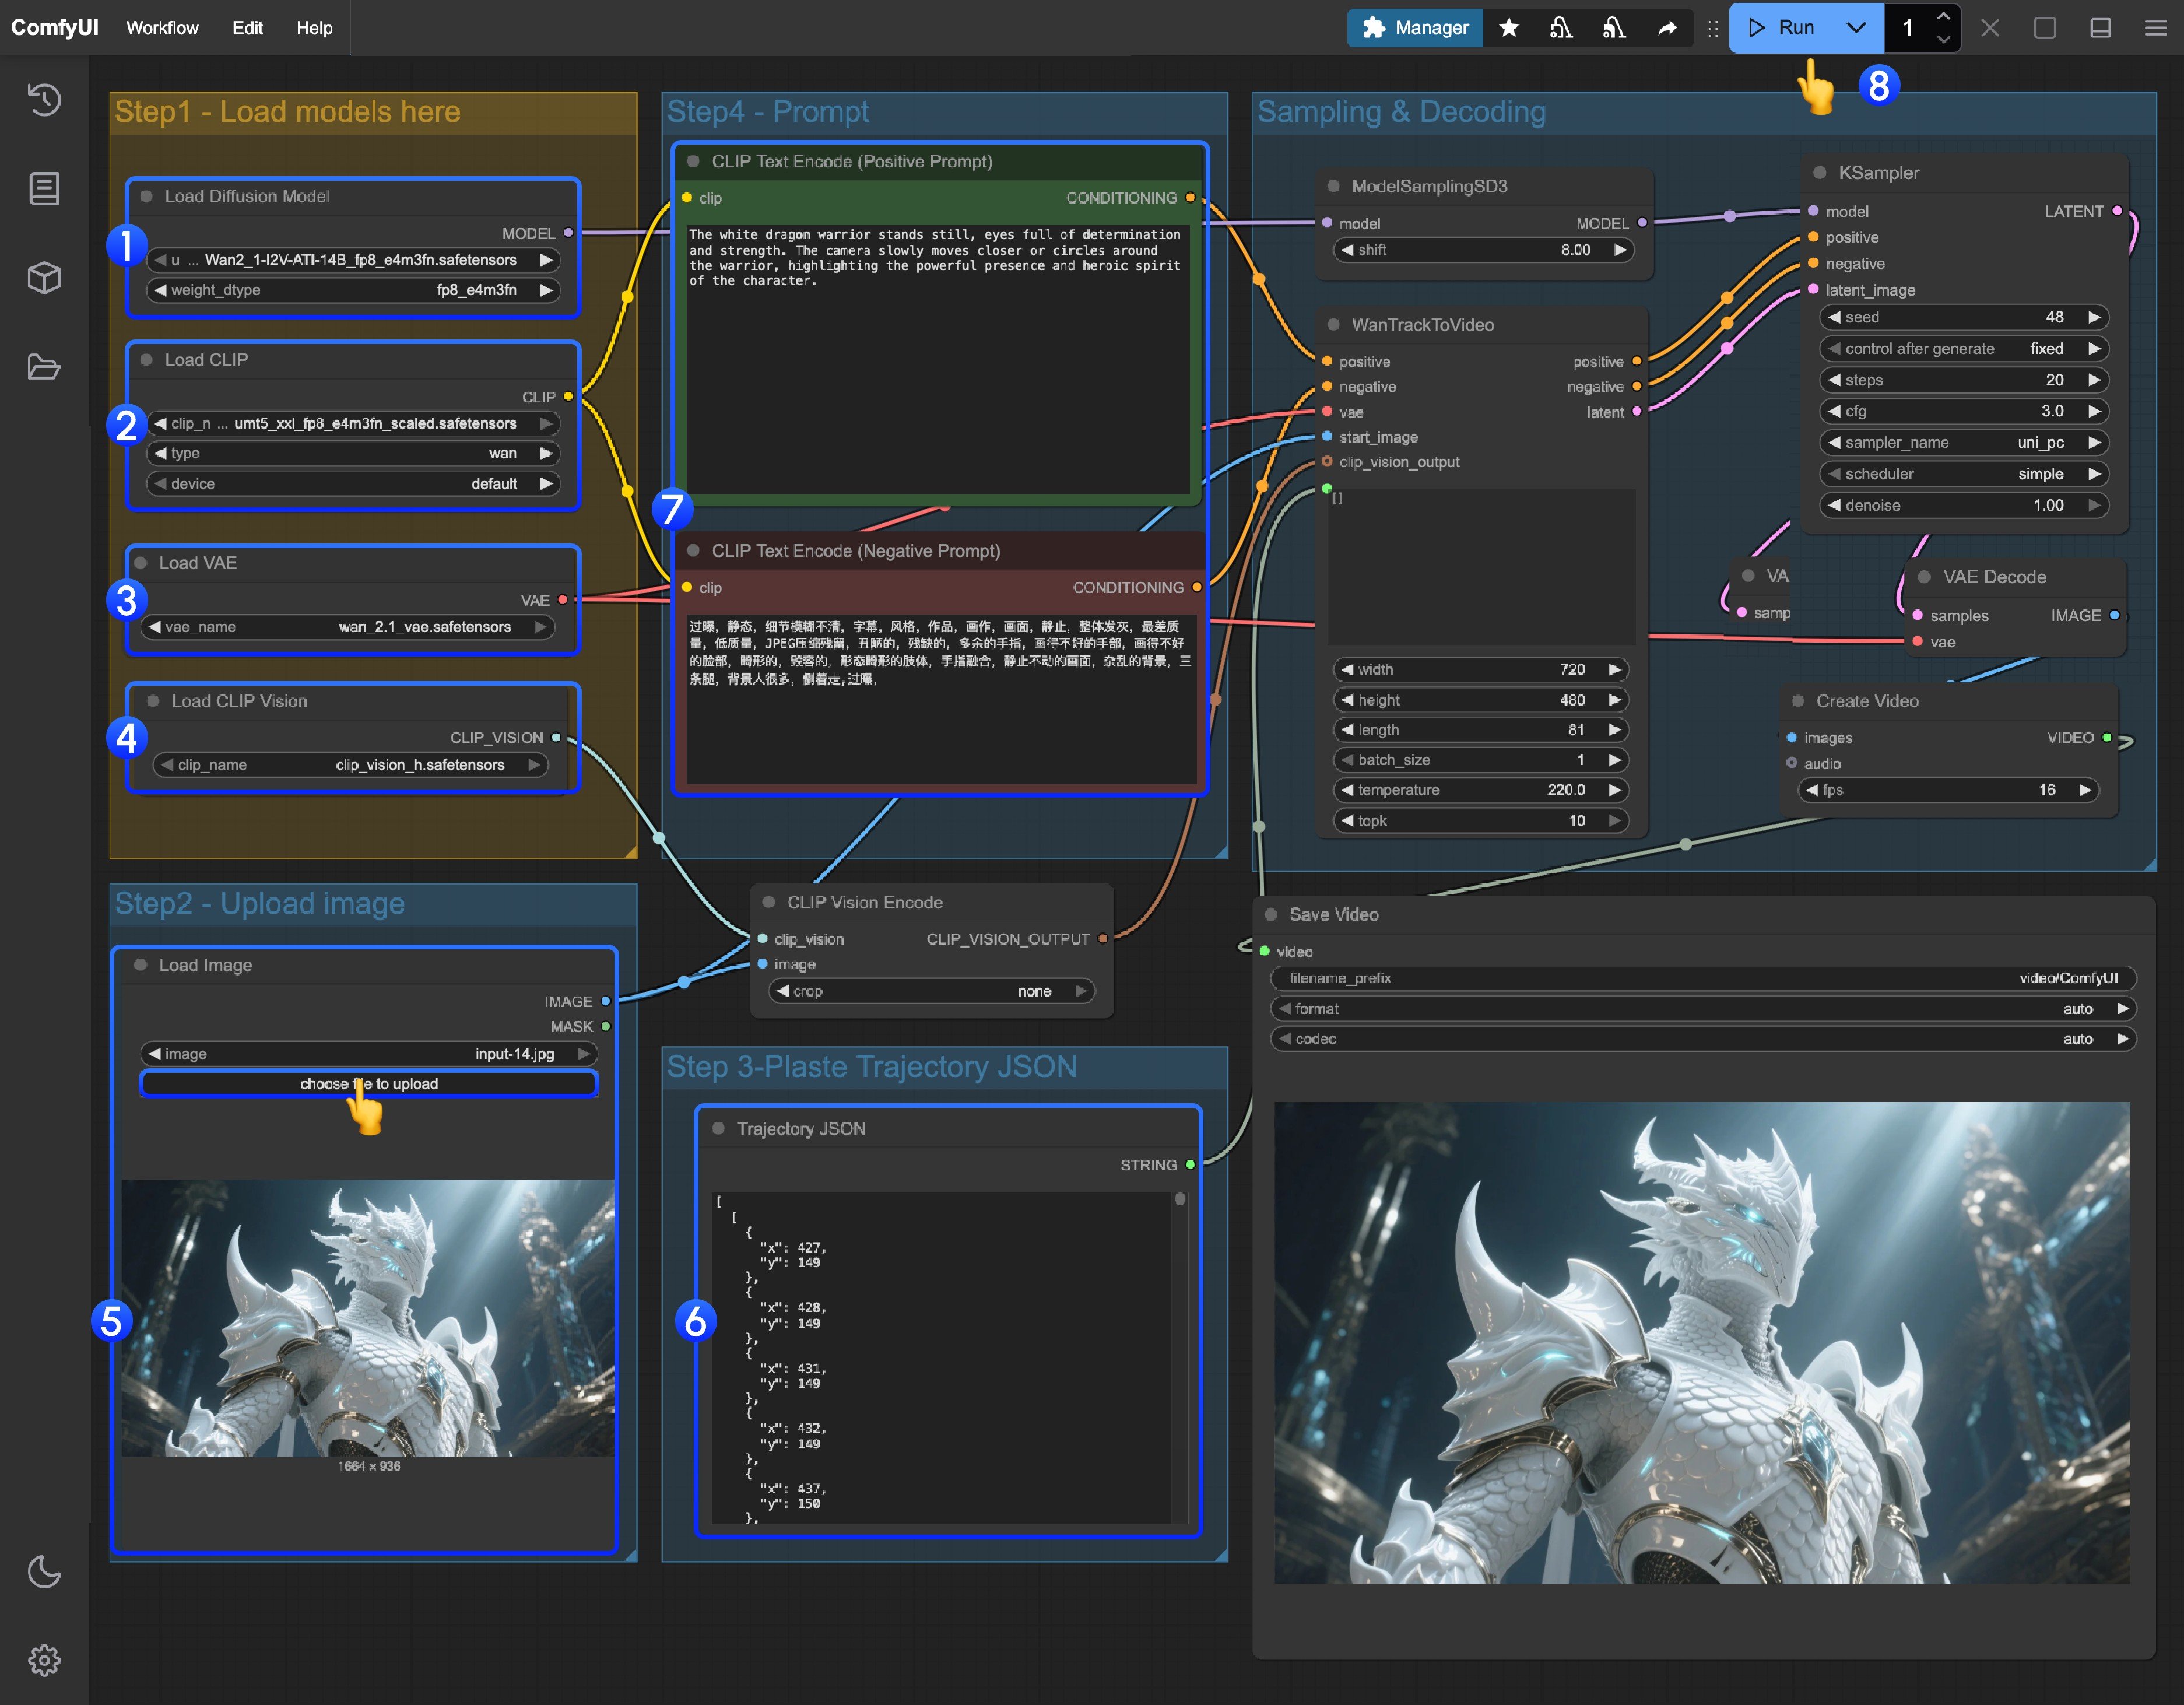 Please follow the numbered steps in the image to ensure smooth execution of the corresponding workflow.
1. Ensure the `Load Diffusion Model` node has loaded the `Wan2_1-I2V-ATI-14B_fp8_e4m3fn.safetensors` model
2. Ensure the `Load CLIP` node has loaded the `umt5_xxl_fp8_e4m3fn_scaled.safetensors` model
3. Ensure the `Load VAE` node has loaded the `wan_2.1_vae.safetensors` model
4. Ensure the `Load CLIP Vision` node has loaded the `clip_vision_h.safetensors` model
5. Upload the provided input image in the `Load Image` node
6. Trajectory editing: Currently there is no corresponding trajectory editor in ComfyUI yet. You can use the following link to complete trajectory editing.
* [Online Trajectory Editing Tool](https://comfyui-wiki.github.io/Trajectory-Annotation-Tool/)
7. If you need to modify the prompts (positive and negative), please make changes in the `CLIP Text Encoder` node numbered `5`
8. Click the `Run` button, or use the shortcut `Ctrl(cmd) + Enter` to execute video generation
Please follow the numbered steps in the image to ensure smooth execution of the corresponding workflow.
1. Ensure the `Load Diffusion Model` node has loaded the `Wan2_1-I2V-ATI-14B_fp8_e4m3fn.safetensors` model
2. Ensure the `Load CLIP` node has loaded the `umt5_xxl_fp8_e4m3fn_scaled.safetensors` model
3. Ensure the `Load VAE` node has loaded the `wan_2.1_vae.safetensors` model
4. Ensure the `Load CLIP Vision` node has loaded the `clip_vision_h.safetensors` model
5. Upload the provided input image in the `Load Image` node
6. Trajectory editing: Currently there is no corresponding trajectory editor in ComfyUI yet. You can use the following link to complete trajectory editing.
* [Online Trajectory Editing Tool](https://comfyui-wiki.github.io/Trajectory-Annotation-Tool/)
7. If you need to modify the prompts (positive and negative), please make changes in the `CLIP Text Encoder` node numbered `5`
8. Click the `Run` button, or use the shortcut `Ctrl(cmd) + Enter` to execute video generation