> ## Documentation Index
> Fetch the complete documentation index at: https://dripart-chore-sync-comfy-api-v2-spec-462120c.mintlify.site/llms.txt
> Use this file to discover all available pages before exploring further.
# ComfyUI 네이티브 HiDream-I1 텍스트 기반 이미지 생성 워크플로 예시
> 이 가이드에서는 ComfyUI 네이티브 HiDream-I1 텍스트 기반 이미지 생성 워크플로 예시를 완료하는 방법을 안내합니다.

HiDream-I1은 2025년 4월 7일 HiDream-ai가 공식적으로 오픈소스로 공개한 텍스트 기반 이미지 생성 모델입니다. 이 모델은 170억 파라미터를 보유하며, [MIT 라이선스](https://github.com/HiDream-ai/HiDream-I1/blob/main/LICENSE)에 따라 배포되며 개인 프로젝트, 과학 연구 및 상업적 사용을 지원합니다. 현재 여러 벤치마크 테스트에서 뛰어난 성능을 발휘하고 있습니다.
## 모델 특징
**하이브리드 아키텍처 설계**
디퓨전 트랜스포머(DiT)와 전문가 혼합(MoE) 아키텍처의 조합:
* 디퓨전 트랜스포머(DiT) 기반으로, 멀티모달 정보를 처리하는 듀얼 스트림 MMDiT 모듈과 글로벌 일관성을 최적화하는 싱글 스트림 DiT 모듈을 결합했습니다.
* 동적 라우팅 메커니즘은 컴퓨팅 자원을 유연하게 할당해 복잡한 장면 처리 능력을 강화하며, 색상 복원, 엣지 처리 등 세부 사항에서도 뛰어난 성능을 제공합니다.
**멀티모달 텍스트 인코더 통합**
네 가지 텍스트 인코더를 통합했습니다:
* OpenCLIP ViT-bigG, OpenAI CLIP ViT-L (시각적 의미 정렬)
* T5-XXL (긴 텍스트 파싱)
* Llama-3.1-8B-Instruct (명령어 이해)
이 조합은 색상, 수량, 공간 관계 등의 복잡한 의미 파싱에서 SOTA 성능을 달성하며, 중국어 프롬프트 지원은 유사한 오픈소스 모델들을 크게 앞서고 있습니다.
**원본 모델 버전**
HiDream-ai는 서로 다른 요구를 충족하기 위해 HiDream-I1 모델의 세 가지 버전을 제공합니다. 아래는 원본 모델 저장소 링크입니다:
| 모델 이름 | 설명 | 추론 단계 | 저장소 링크 |
| --------------- | ---------- | ----- | ----------------------------------------------------------------------- |
| HiDream-I1-Full | 풀버전 | 50 | [🤗 HiDream-I1-Full](https://huggingface.co/HiDream-ai/HiDream-I1-Full) |
| HiDream-I1-Dev | 디스틸된 개발용 | 28 | [🤗 HiDream-I1-Dev](https://huggingface.co/HiDream-ai/HiDream-I1-Dev) |
| HiDream-I1-Fast | 디스틸된 빠른 버전 | 16 | [🤗 HiDream-I1-Fast](https://huggingface.co/HiDream-ai/HiDream-I1-Fast) |
## 이 워크플로우 예시 소개
이 예시에서는 ComfyOrg에서 재포장한 버전을 사용할 것입니다. 이 예시에서 사용할 모든 모델 파일은 [HiDream-I1\_ComfyUI](https://huggingface.co/Comfy-Org/HiDream-I1_ComfyUI/) 저장소에서 확인하실 수 있습니다.
시작하기 전에 ComfyUI 버전을 이 [커밋](https://github.com/Comfy-Org/ComfyUI/commit/9ad792f92706e2179c58b2e5348164acafa69288) 이후 버전 이상으로 업데이트하여 ComfyUI가 HiDream에 대한 기본 지원을 갖추도록 해주세요.
## HiDream-I1 워크플로
다양한 ComfyUI 네이티브 HiDream-I1 워크플로의 모델 요구 사항은 기본적으로 동일하며, [확산 모델](https://huggingface.co/Comfy-Org/HiDream-I1_ComfyUI/tree/main/split_files/diffusion_models) 파일만 다릅니다.
어떤 버전을 선택해야 할지 모르겠다면 다음 제안을 참고하세요:
* **HiDream-I1-Full**은 가장 높은 품질의 이미지를 생성할 수 있습니다
* **HiDream-I1-Dev**는 고품질 이미지 생성과 속도의 균형을 맞춥니다
* **HiDream-I1-Fast**는 단 16단계만으로 이미지를 생성할 수 있어 실시간 반복이 필요한 시나리오에 적합합니다
**Dev** 및 **Fast** 버전에서는 네거티브 프롬프트가 필요하지 않으므로, 샘플링 중 `cfg` 파라미터를 `1.0`으로 설정해 주세요. 관련 워크플로에서 해당 파라미터 설정을 명시해 두었습니다.
세 가지 버전 모두 전체(full) 버전은 많은 VRAM을 필요로 합니다. 원활하게 실행하려면 27GB 이상의 VRAM이 필요할 수 있습니다. 해당 워크플로 튜토리얼에서는 대부분의 사용자가 원활하게 실행할 수 있도록 **fp8** 버전을 데모 예시로 사용합니다.
하지만 해당 예시에서 다양한 버전의 모델 다운로드 링크를 계속 제공할 예정이므로, VRAM 상황에 따라 적절한 파일을 선택할 수 있습니다.
### 모델 설치
다음 모델 파일은 공통으로 사용할 파일입니다.
해당 링크를 클릭하여 다운로드한 후, 모델 파일 저장 위치에 따라 저장해 주세요.
해당 워크플로에서 적절한 **확산 모델**을 다운로드하도록 안내하겠습니다.
**text\_encoders**:
* [clip\_l\_hidream.safetensors](https://huggingface.co/Comfy-Org/HiDream-I1_ComfyUI/blob/main/split_files/text_encoders/clip_l_hidream.safetensors)
* [clip\_g\_hidream.safetensors](https://huggingface.co/Comfy-Org/HiDream-I1_ComfyUI/blob/main/split_files/text_encoders/clip_g_hidream.safetensors)
* [t5xxl\_fp8\_e4m3fn\_scaled.safetensors](https://huggingface.co/Comfy-Org/HiDream-I1_ComfyUI/blob/main/split_files/text_encoders/t5xxl_fp8_e4m3fn_scaled.safetensors) 이 모델은 많은 워크플로에서 사용되어 이미 이 파일을 다운로드했을 수 있습니다.
* [llama\_3.1\_8b\_instruct\_fp8\_scaled.safetensors](https://huggingface.co/Comfy-Org/HiDream-I1_ComfyUI/blob/main/split_files/text_encoders/llama_3.1_8b_instruct_fp8_scaled.safetensors)
**VAE**
* [ae.safetensors](https://huggingface.co/Comfy-Org/HiDream-I1_ComfyUI/blob/main/split_files/vae/ae.safetensors) 이는 FLUX의 VAE 모델입니다. 이전에 FLUX 워크플로를 사용한 적이 있다면 이미 이 파일을 다운로드했을 수 있습니다.
**확산 모델**
해당 워크플로에서 적절한 모델 파일을 다운로드하도록 안내하겠습니다.
모델 파일 저장 위치
```
📂 ComfyUI/
├── 📂 models/
│ ├── 📂 text_encoders/
│ │ ├─── clip_l_hidream.safetensors
│ │ ├─── clip_g_hidream.safetensors
│ │ ├─── t5xxl_fp8_e4m3fn_scaled.safetensors
│ │ └─── llama_3.1_8b_instruct_fp8_scaled.safetensors
│ └── 📂 vae/
│ │ └── ae.safetensors
│ └── 📂 diffusion_models/
│ └── ... # 해당 버전 워크플로에서 설치를 안내하겠습니다.
```
### HiDream I1 전체 버전 워크플로
HiDream I1 Full
HiDream I1 Full로 이미지를 생성합니다. 최고 품질의 출력을 위한 50단계 추론의 완전 버전입니다.
 이 워크플로를 Comfy Cloud에서 설정 없이 실행하세요.
워크플로 JSON 파일 다운로드
**예시 출력**

#### 1. 모델 파일 다운로드
하드웨어에 따라 적절한 버전을 선택하세요. 링크를 클릭하여 해당 모델 파일을 다운로드하고 `ComfyUI/models/diffusion_models/` 폴더에 저장하세요.
* FP8 버전: [hidream\_i1\_full\_fp8.safetensors](https://huggingface.co/Comfy-Org/HiDream-I1_ComfyUI/blob/main/split_files/diffusion_models/hidream_i1_full_fp8.safetensors?download=true) (16GB 이상의 VRAM 필요)
* 전체 버전: [hidream\_i1\_full\_fp16.safetensors](https://huggingface.co/Comfy-Org/HiDream-I1_ComfyUI/blob/main/split_files/diffusion_models/hidream_i1_full_fp16.safetensors?download=true) (27GB 이상의 VRAM 필요)
#### 2. 워크플로 파일 다운로드
아래 이미지를 다운로드한 후 ComfyUI로 드래그하여 해당 워크플로를 로드하세요.

#### 3. 워크플로 단계별 완료
이 워크플로를 Comfy Cloud에서 설정 없이 실행하세요.
워크플로 JSON 파일 다운로드
**예시 출력**

#### 1. 모델 파일 다운로드
하드웨어에 따라 적절한 버전을 선택하세요. 링크를 클릭하여 해당 모델 파일을 다운로드하고 `ComfyUI/models/diffusion_models/` 폴더에 저장하세요.
* FP8 버전: [hidream\_i1\_full\_fp8.safetensors](https://huggingface.co/Comfy-Org/HiDream-I1_ComfyUI/blob/main/split_files/diffusion_models/hidream_i1_full_fp8.safetensors?download=true) (16GB 이상의 VRAM 필요)
* 전체 버전: [hidream\_i1\_full\_fp16.safetensors](https://huggingface.co/Comfy-Org/HiDream-I1_ComfyUI/blob/main/split_files/diffusion_models/hidream_i1_full_fp16.safetensors?download=true) (27GB 이상의 VRAM 필요)
#### 2. 워크플로 파일 다운로드
아래 이미지를 다운로드한 후 ComfyUI로 드래그하여 해당 워크플로를 로드하세요.

#### 3. 워크플로 단계별 완료
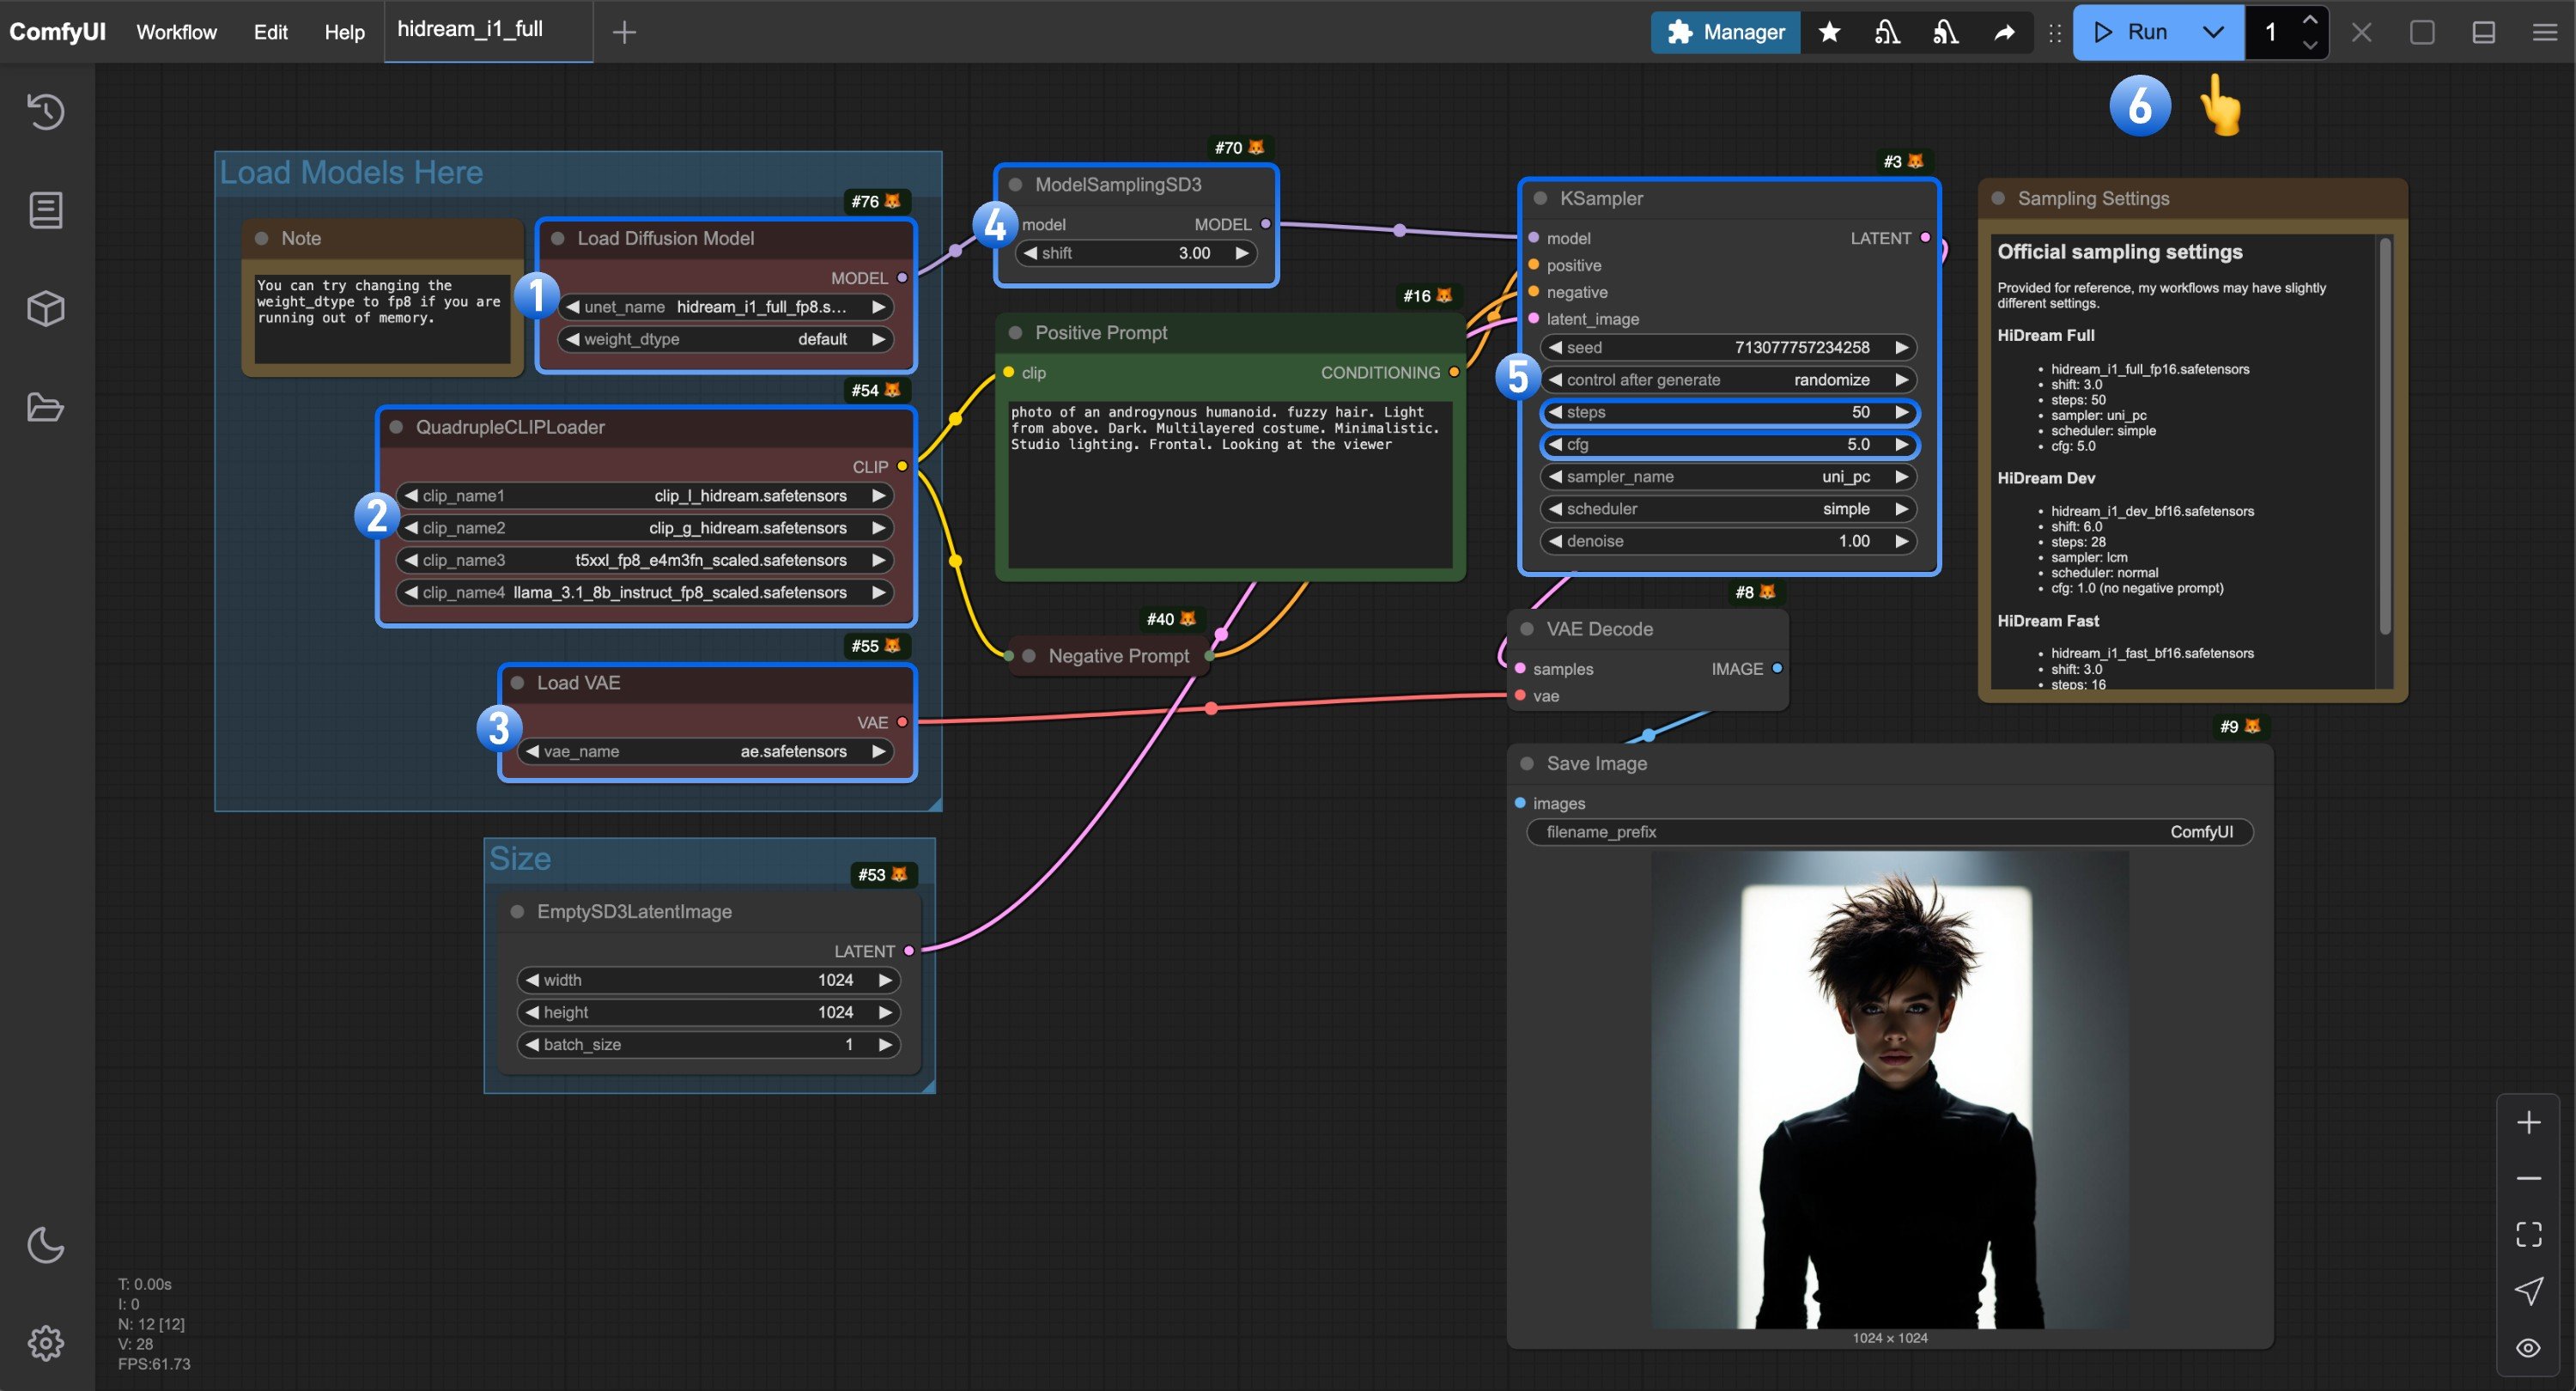 워크플로 실행을 단계별로 완료하세요.
1. `Load Diffusion Model` 노드가 `hidream_i1_full_fp8.safetensors` 파일을 사용하고 있는지 확인하세요.
2. `QuadrupleCLIPLoader`에 있는 네 개의 해당 텍스트 인코더가 올바르게 로드되었는지 확인하세요.
* clip\_l\_hidream.safetensors
* clip\_g\_hidream.safetensors
* t5xxl\_fp8\_e4m3fn\_scaled.safetensors
* llama\_3.1\_8b\_instruct\_fp8\_scaled.safetensors
3. `Load VAE` 노드가 `ae.safetensors` 파일을 사용하고 있는지 확인하세요.
4. **전체** 버전의 경우 `ModelSamplingSD3`에서 `shift` 파라미터를 `3.0`으로 설정해야 합니다.
5. `Ksampler` 노드의 경우 다음 설정을 해야 합니다.
* `steps`를 `50`으로 설정
* `cfg`를 `5.0`으로 설정
* (선택 사항) `sampler`를 `lcm`으로 설정
* (선택 사항) `scheduler`를 `normal`로 설정
6. `Run` 버튼을 클릭하거나 단축키 `Ctrl(cmd) + Enter`를 사용하여 이미지 생성을 실행하세요.
### HiDream-I1 개발 전용 버전 워크플로
워크플로 실행을 단계별로 완료하세요.
1. `Load Diffusion Model` 노드가 `hidream_i1_full_fp8.safetensors` 파일을 사용하고 있는지 확인하세요.
2. `QuadrupleCLIPLoader`에 있는 네 개의 해당 텍스트 인코더가 올바르게 로드되었는지 확인하세요.
* clip\_l\_hidream.safetensors
* clip\_g\_hidream.safetensors
* t5xxl\_fp8\_e4m3fn\_scaled.safetensors
* llama\_3.1\_8b\_instruct\_fp8\_scaled.safetensors
3. `Load VAE` 노드가 `ae.safetensors` 파일을 사용하고 있는지 확인하세요.
4. **전체** 버전의 경우 `ModelSamplingSD3`에서 `shift` 파라미터를 `3.0`으로 설정해야 합니다.
5. `Ksampler` 노드의 경우 다음 설정을 해야 합니다.
* `steps`를 `50`으로 설정
* `cfg`를 `5.0`으로 설정
* (선택 사항) `sampler`를 `lcm`으로 설정
* (선택 사항) `scheduler`를 `normal`로 설정
6. `Run` 버튼을 클릭하거나 단축키 `Ctrl(cmd) + Enter`를 사용하여 이미지 생성을 실행하세요.
### HiDream-I1 개발 전용 버전 워크플로
HiDream I1 Dev
HiDream I1 Dev로 이미지를 생성합니다. 28개의 추론 단계를 가진 균형 잡힌 버전으로, 중간 사양 하드웨어에 적합합니다.
 이 워크플로를 Comfy Cloud에서 설정 없이 실행하세요.
워크플로 JSON 파일 다운로드
**출력 예시**

#### 1. 모델 파일 다운로드
하드웨어에 따라 적합한 버전을 선택하고, 링크를 클릭하여 해당 모델 파일을 다운로드한 후 `ComfyUI/models/diffusion_models/` 폴더에 저장하세요.
* FP8 버전: [hidream\_i1\_dev\_fp8.safetensors](https://huggingface.co/Comfy-Org/HiDream-I1_ComfyUI/blob/main/split_files/diffusion_models/hidream_i1_dev_fp8.safetensors?download=true) 16GB 이상의 VRAM 필요
* 전체 버전: [hidream\_i1\_dev\_bf16.safetensors](https://huggingface.co/Comfy-Org/HiDream-I1_ComfyUI/blob/main/split_files/diffusion_models/hidream_i1_dev_bf16.safetensors?download=true) 27GB 이상의 VRAM 필요
#### 2. 워크플로 파일 다운로드
아래 이미지를 다운로드하여 ComfyUI로 드래그하면 해당 워크플로가 로드됩니다.

#### 3. 워크플로 단계별 완료
이 워크플로를 Comfy Cloud에서 설정 없이 실행하세요.
워크플로 JSON 파일 다운로드
**출력 예시**

#### 1. 모델 파일 다운로드
하드웨어에 따라 적합한 버전을 선택하고, 링크를 클릭하여 해당 모델 파일을 다운로드한 후 `ComfyUI/models/diffusion_models/` 폴더에 저장하세요.
* FP8 버전: [hidream\_i1\_dev\_fp8.safetensors](https://huggingface.co/Comfy-Org/HiDream-I1_ComfyUI/blob/main/split_files/diffusion_models/hidream_i1_dev_fp8.safetensors?download=true) 16GB 이상의 VRAM 필요
* 전체 버전: [hidream\_i1\_dev\_bf16.safetensors](https://huggingface.co/Comfy-Org/HiDream-I1_ComfyUI/blob/main/split_files/diffusion_models/hidream_i1_dev_bf16.safetensors?download=true) 27GB 이상의 VRAM 필요
#### 2. 워크플로 파일 다운로드
아래 이미지를 다운로드하여 ComfyUI로 드래그하면 해당 워크플로가 로드됩니다.

#### 3. 워크플로 단계별 완료
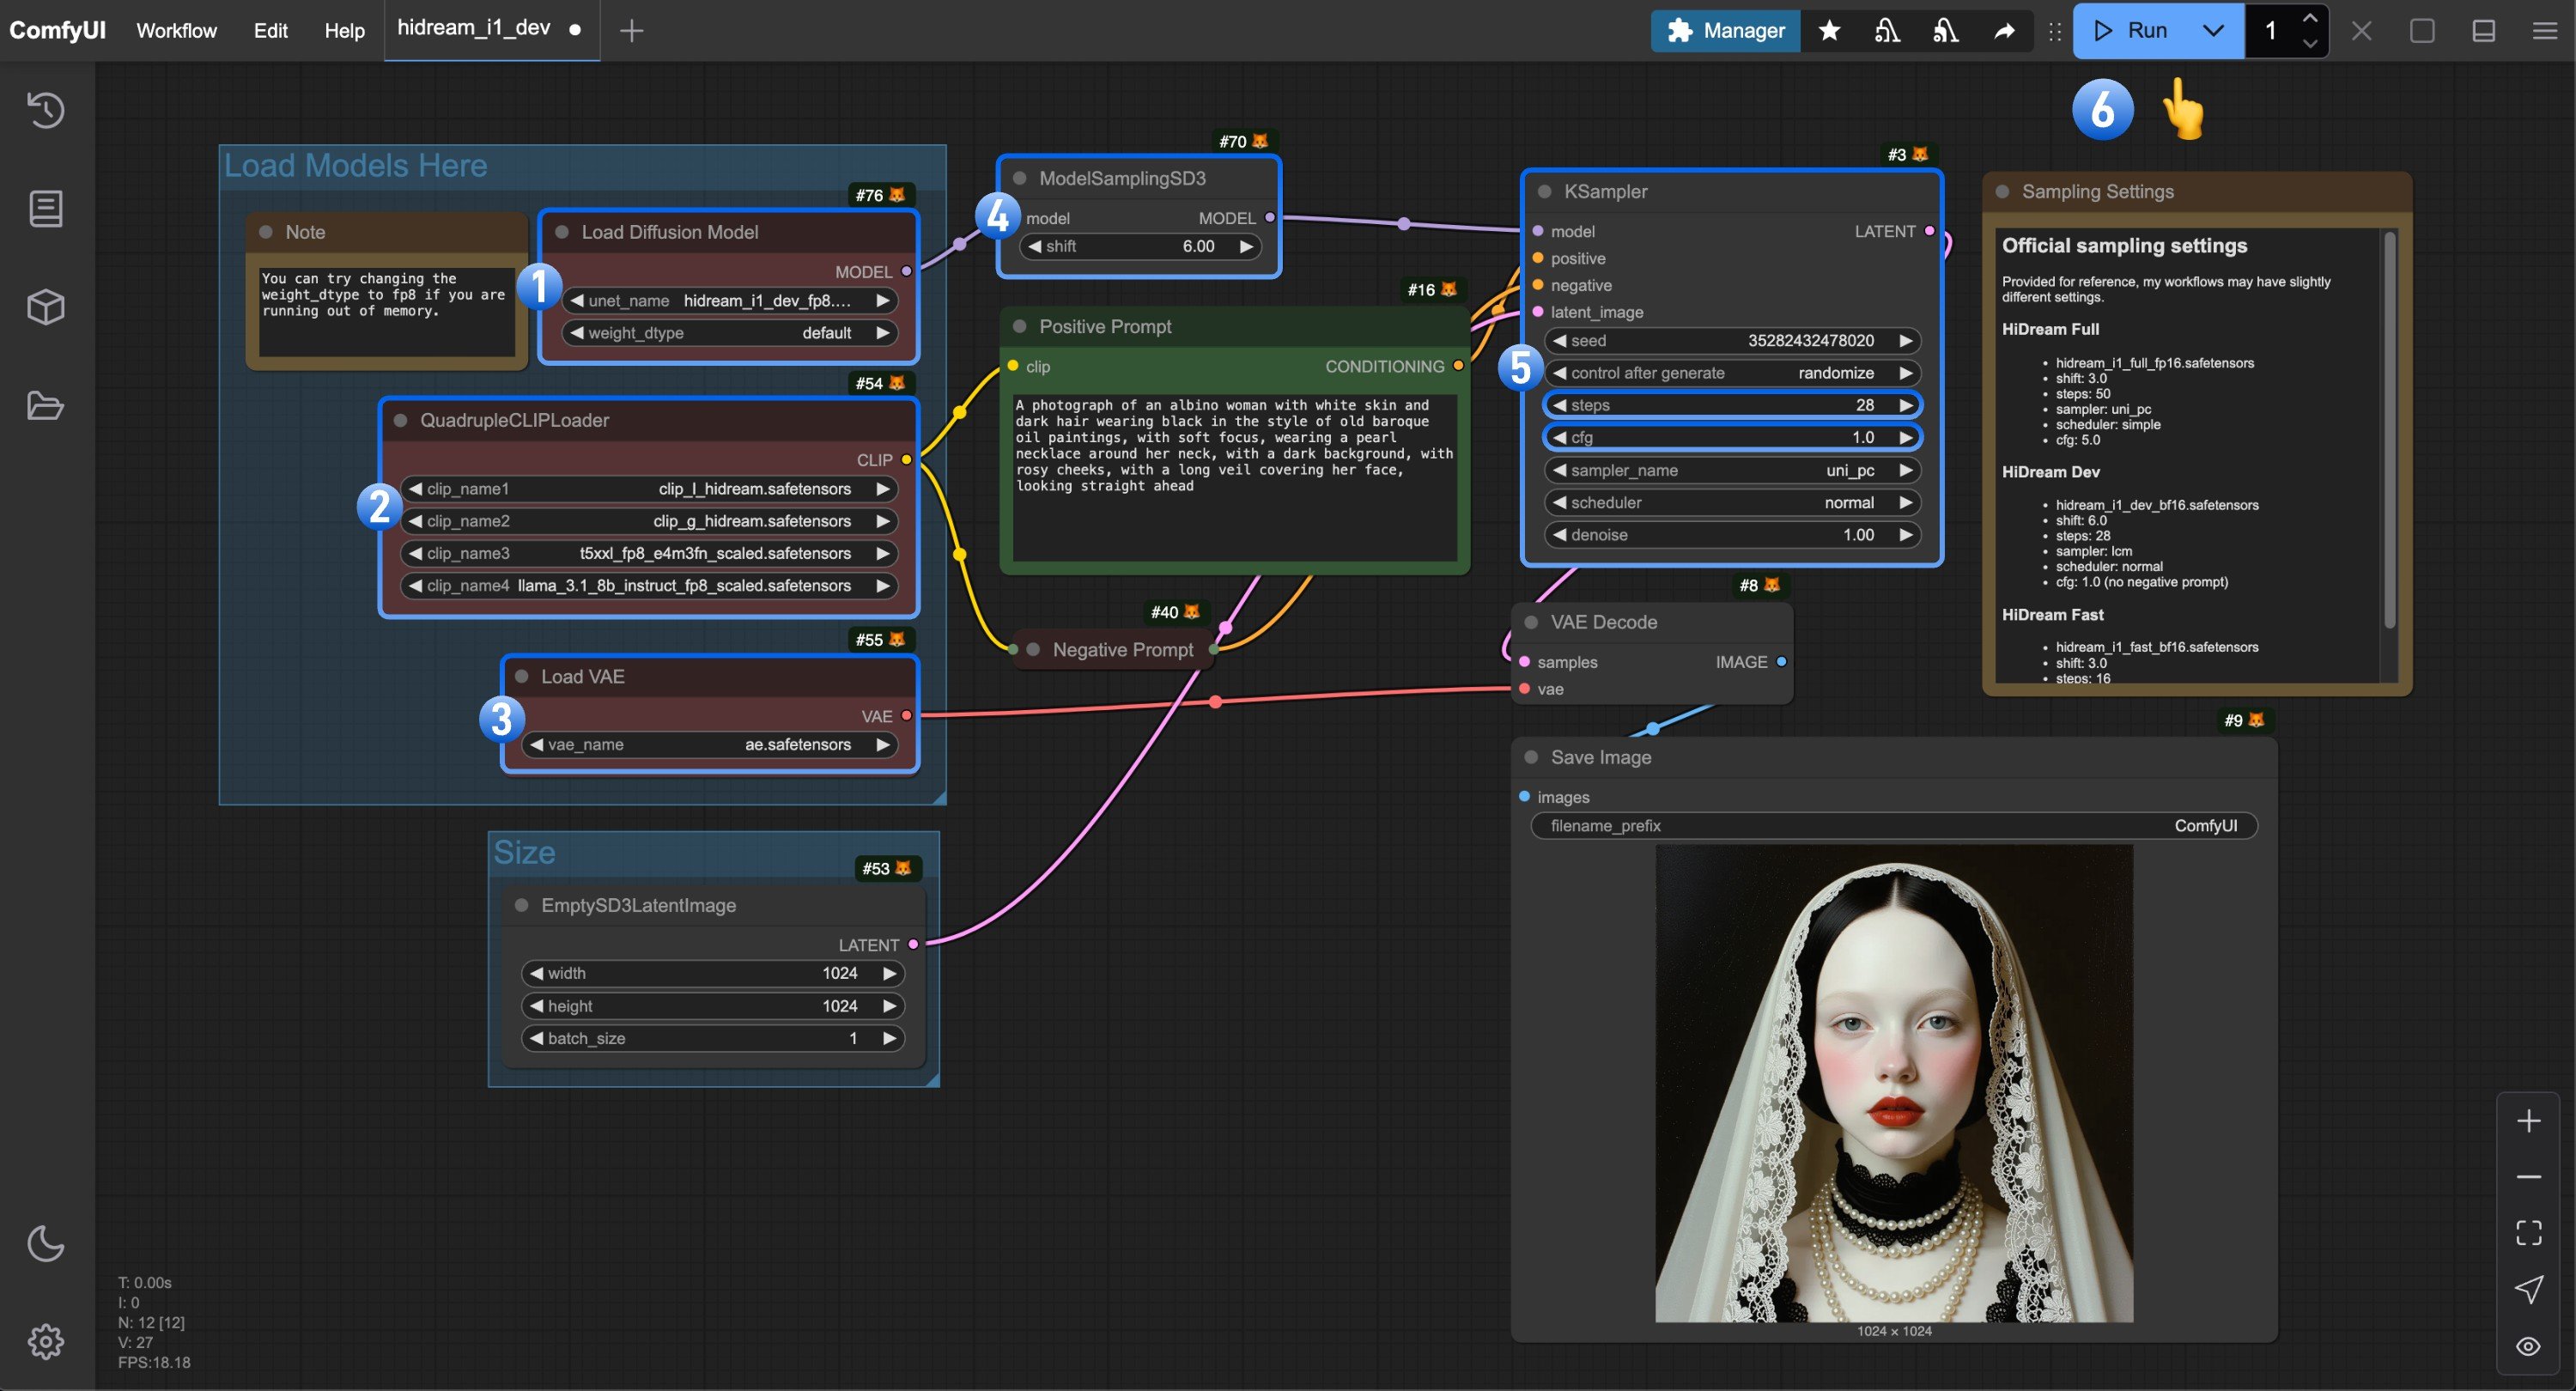 워크플로 실행을 단계별로 완료하세요.
1. `Load Diffusion Model` 노드가 `hidream_i1_dev_fp8.safetensors` 파일을 사용하고 있는지 확인하세요.
2. `QuadrupleCLIPLoader`의 네 가지 해당 텍스트 인코더가 올바르게 로드되었는지 확인하세요.
* clip\_l\_hidream.safetensors
* clip\_g\_hidream.safetensors
* t5xxl\_fp8\_e4m3fn\_scaled.safetensors
* llama\_3.1\_8b\_instruct\_fp8\_scaled.safetensors
3. `Load VAE` 노드가 `ae.safetensors` 파일을 사용하고 있는지 확인하세요.
4. **개발 전용** 버전의 경우, `ModelSamplingSD3`에서 `shift` 매개변수를 `6.0`으로 설정해야 합니다.
5. `Ksampler` 노드에서 다음 설정을 해야 합니다.
* `steps`를 `28`로 설정
* (중요) `cfg`를 `1.0`으로 설정
* (선택 사항) `sampler`를 `lcm`으로 설정
* (선택 사항) `scheduler`를 `노멀(normal)`로 설정
6. `Run` 버튼을 클릭하거나 단축키 `Ctrl(cmd) + Enter`를 사용하여 이미지 생성을 실행하세요.
### HiDream-I1 Fast 버전 워크플로
워크플로 실행을 단계별로 완료하세요.
1. `Load Diffusion Model` 노드가 `hidream_i1_dev_fp8.safetensors` 파일을 사용하고 있는지 확인하세요.
2. `QuadrupleCLIPLoader`의 네 가지 해당 텍스트 인코더가 올바르게 로드되었는지 확인하세요.
* clip\_l\_hidream.safetensors
* clip\_g\_hidream.safetensors
* t5xxl\_fp8\_e4m3fn\_scaled.safetensors
* llama\_3.1\_8b\_instruct\_fp8\_scaled.safetensors
3. `Load VAE` 노드가 `ae.safetensors` 파일을 사용하고 있는지 확인하세요.
4. **개발 전용** 버전의 경우, `ModelSamplingSD3`에서 `shift` 매개변수를 `6.0`으로 설정해야 합니다.
5. `Ksampler` 노드에서 다음 설정을 해야 합니다.
* `steps`를 `28`로 설정
* (중요) `cfg`를 `1.0`으로 설정
* (선택 사항) `sampler`를 `lcm`으로 설정
* (선택 사항) `scheduler`를 `노멀(normal)`로 설정
6. `Run` 버튼을 클릭하거나 단축키 `Ctrl(cmd) + Enter`를 사용하여 이미지 생성을 실행하세요.
### HiDream-I1 Fast 버전 워크플로
HiDream I1 Fast
HiDream I1 Fast로 이미지를 빠르게 생성하세요. 16개의 추론 단계를 가진 경량 버전으로, 저사양 하드웨어에서 빠른 미리보기에 이상적입니다.
 설정 없이 Comfy Cloud에서 이 워크플로 실행
워크플로 JSON 파일 다운로드
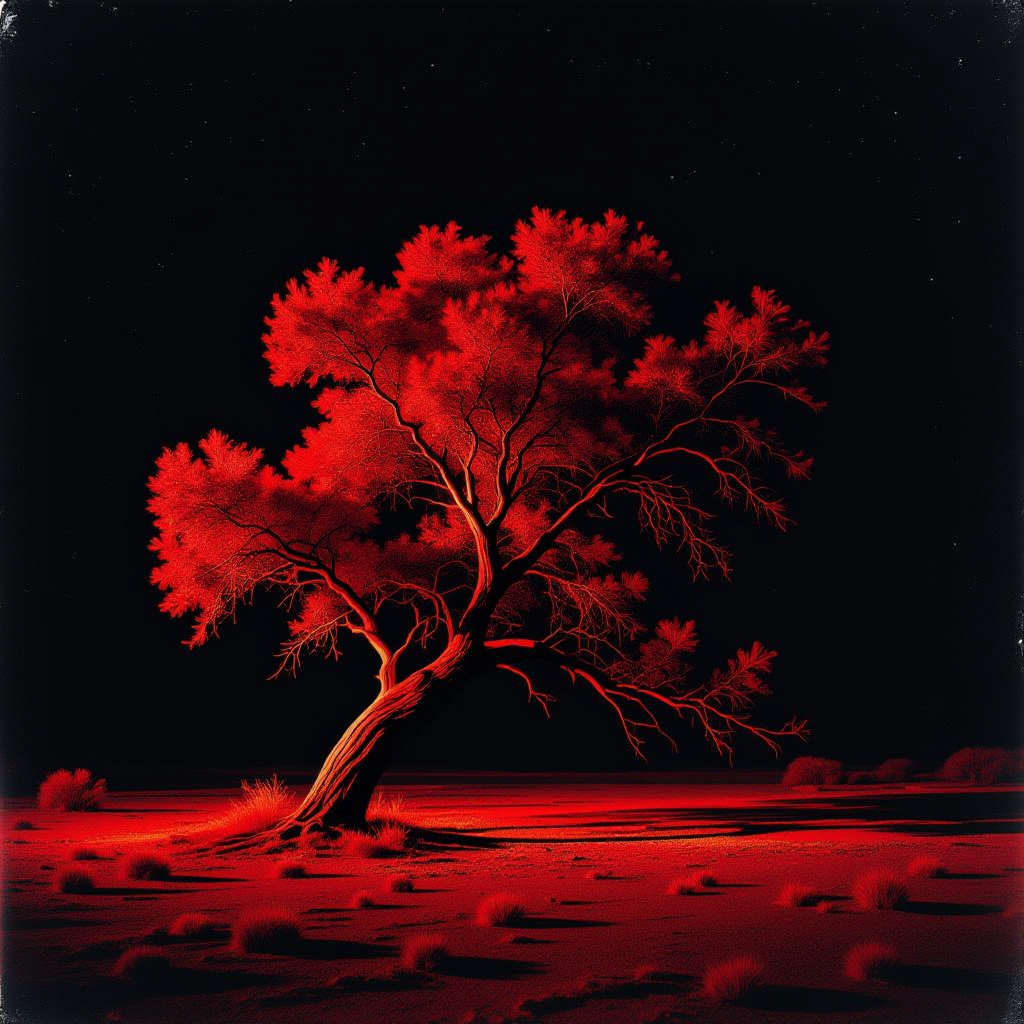
**예제 출력**
#### 1. 모델 파일 다운로드
하드웨어에 맞는 적절한 버전을 선택하고, 링크를 클릭하여 해당 모델 파일을 다운로드한 후 `ComfyUI/models/diffusion_models/` 폴더에 저장하세요.
* FP8 버전: [hidream\_i1\_fast\_fp8.safetensors](https://huggingface.co/Comfy-Org/HiDream-I1_ComfyUI/blob/main/split_files/diffusion_models/hidream_i1_fast_fp8.safetensors?download=true) – 16GB 이상의 VRAM 필요
* 전체 버전: [hidream\_i1\_fast\_bf16.safetensors](https://huggingface.co/Comfy-Org/HiDream-I1_ComfyUI/blob/main/split_files/diffusion_models/hidream_i1_fast_bf16.safetensors?download=true) – 27GB 이상의 VRAM 필요
#### 2. 워크플로 파일 다운로드
아래 이미지를 다운로드하여 ComfyUI로 드래그하면 해당 워크플로가 로드됩니다.

#### 3. 워크플로 단계별 완료
설정 없이 Comfy Cloud에서 이 워크플로 실행
워크플로 JSON 파일 다운로드
**예제 출력**

#### 1. 모델 파일 다운로드
하드웨어에 맞는 적절한 버전을 선택하고, 링크를 클릭하여 해당 모델 파일을 다운로드한 후 `ComfyUI/models/diffusion_models/` 폴더에 저장하세요.
* FP8 버전: [hidream\_i1\_fast\_fp8.safetensors](https://huggingface.co/Comfy-Org/HiDream-I1_ComfyUI/blob/main/split_files/diffusion_models/hidream_i1_fast_fp8.safetensors?download=true) – 16GB 이상의 VRAM 필요
* 전체 버전: [hidream\_i1\_fast\_bf16.safetensors](https://huggingface.co/Comfy-Org/HiDream-I1_ComfyUI/blob/main/split_files/diffusion_models/hidream_i1_fast_bf16.safetensors?download=true) – 27GB 이상의 VRAM 필요
#### 2. 워크플로 파일 다운로드
아래 이미지를 다운로드하여 ComfyUI로 드래그하면 해당 워크플로가 로드됩니다.

#### 3. 워크플로 단계별 완료
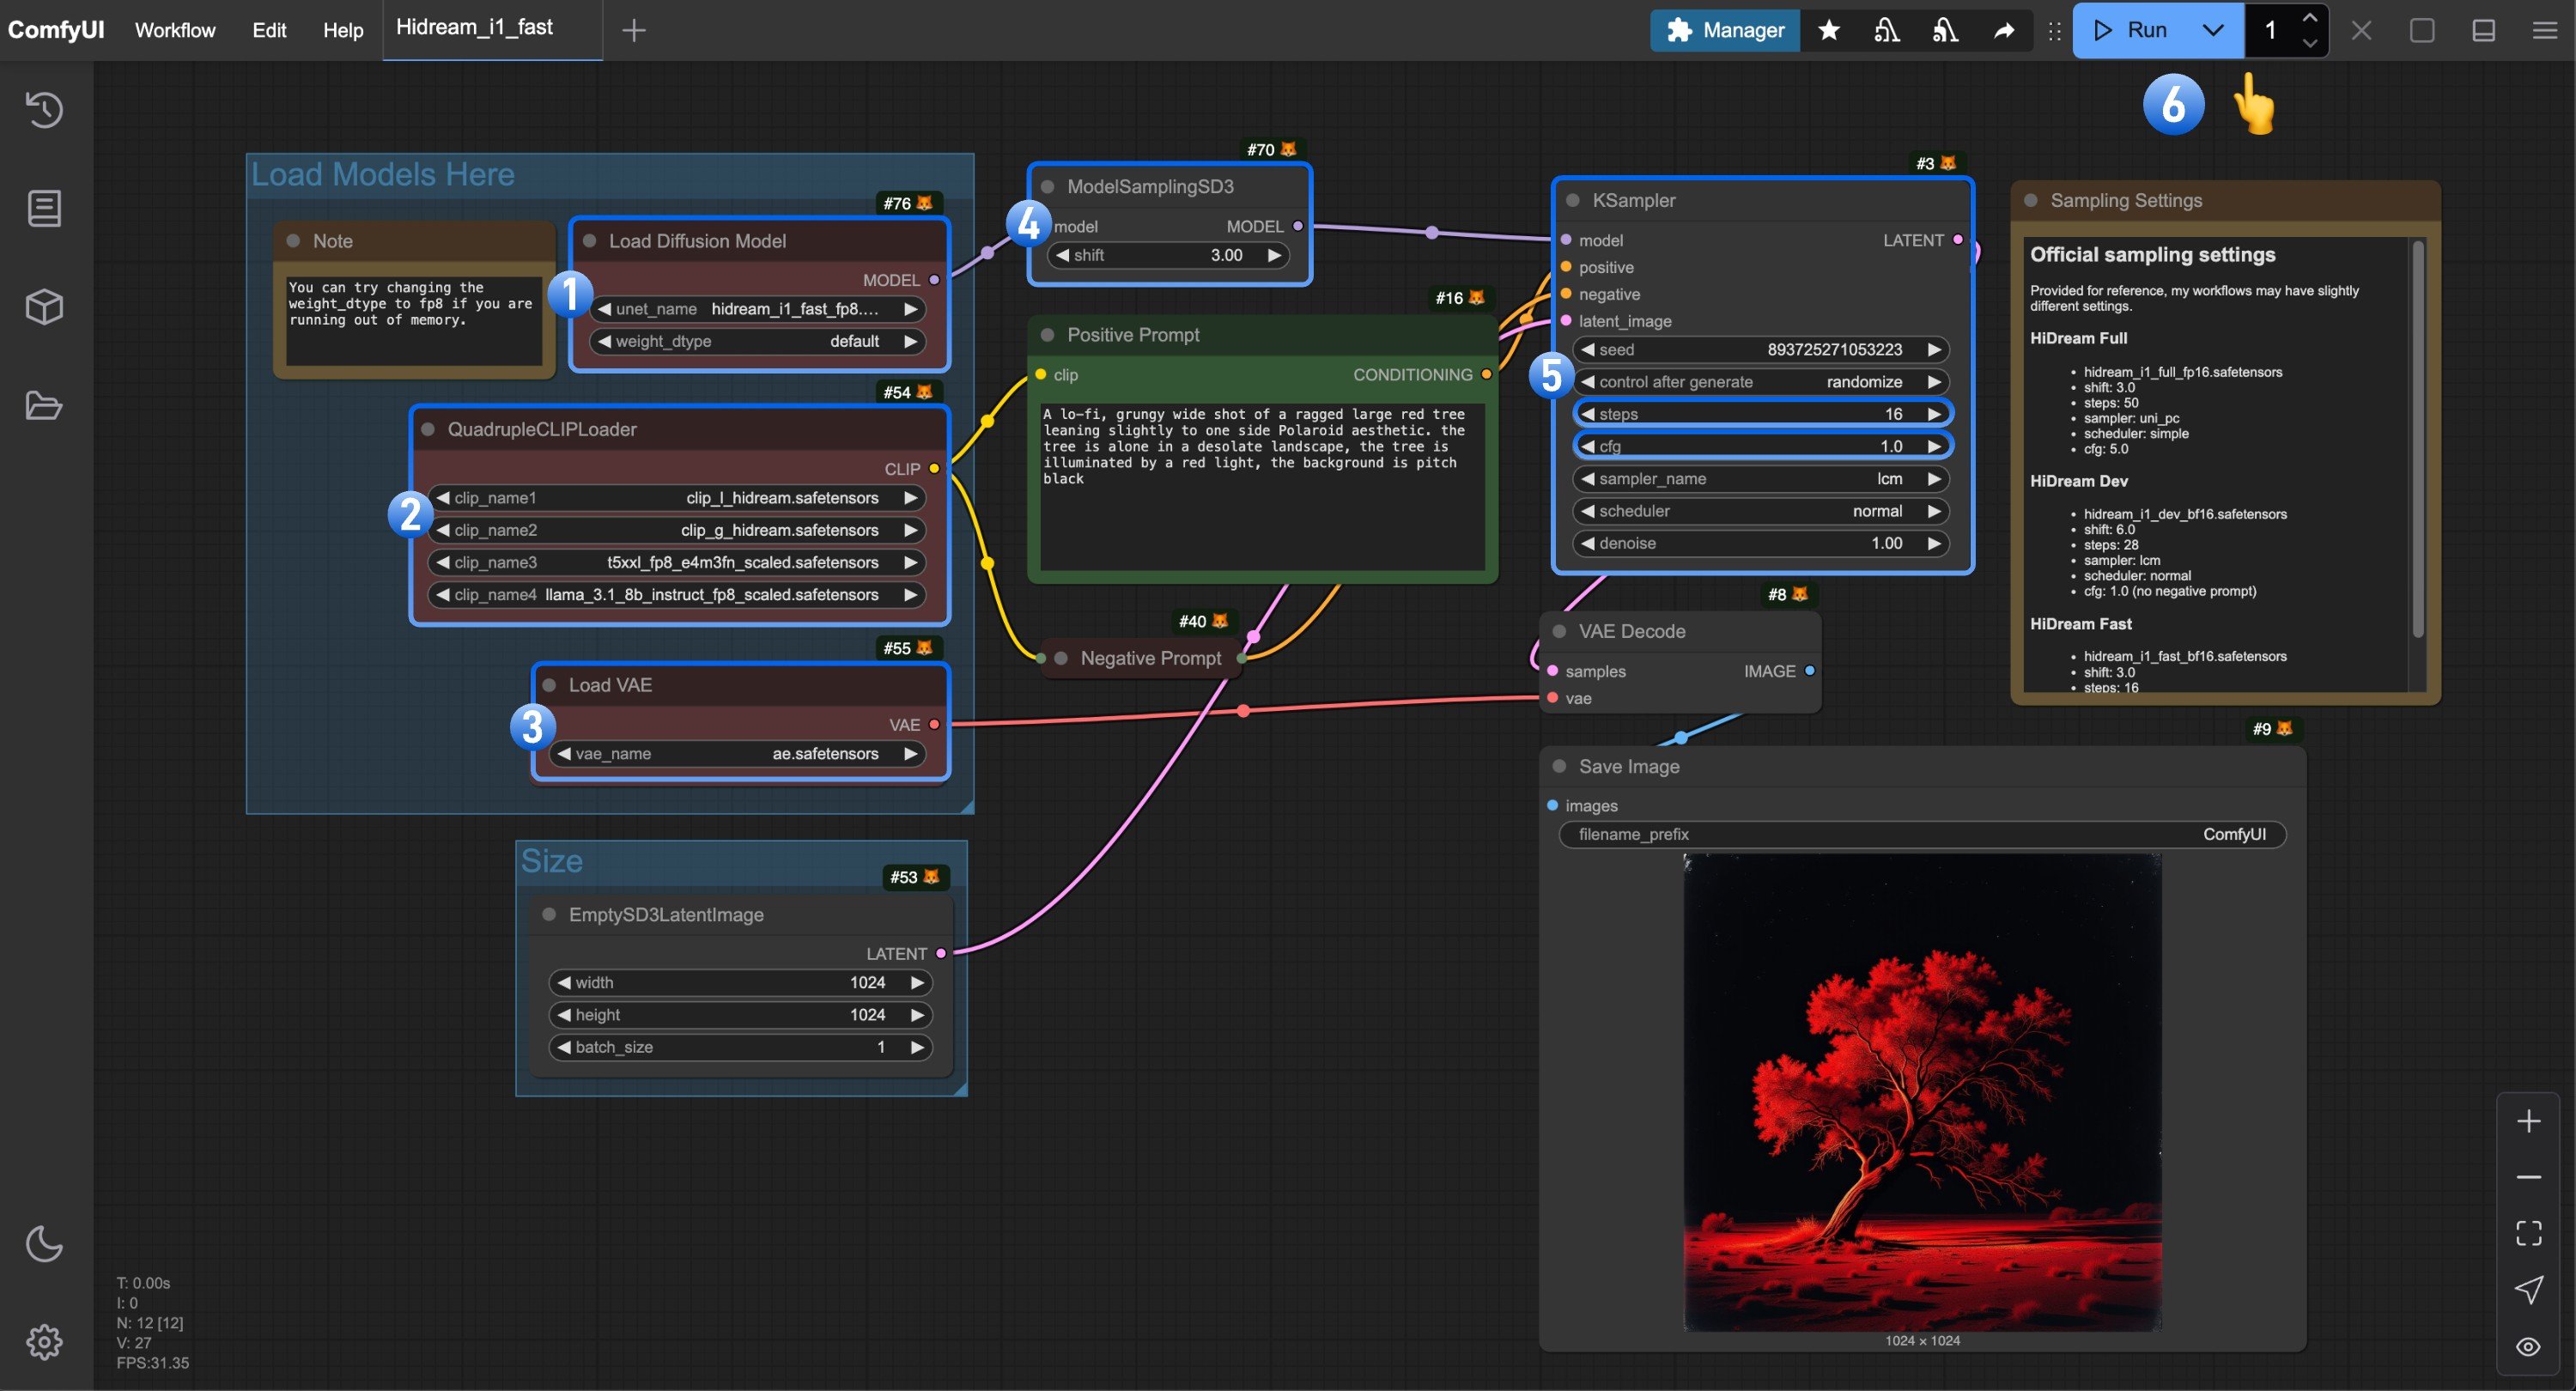 워크플로 실행을 단계별로 완료하세요.
1. `Load Diffusion Model` 노드가 `hidream_i1_fast_fp8.safetensors` 파일을 사용하는지 확인합니다.
2. `QuadrupleCLIPLoader`의 네 개 해당 텍스트 인코더가 올바르게 로드되었는지 확인합니다.
* clip\_l\_hidream.safetensors
* clip\_g\_hidream.safetensors
* t5xxl\_fp8\_e4m3fn\_scaled.safetensors
* llama\_3.1\_8b\_instruct\_fp8\_scaled.safetensors
3. `Load VAE` 노드가 `ae.safetensors` 파일을 사용하는지 확인합니다.
4. **fast** 버전의 경우 `ModelSamplingSD3`에서 `shift` 매개변수를 `3.0`으로 설정해야 합니다.
5. `Ksampler` 노드의 경우 다음 설정을 해야 합니다.
* `steps`를 `16`으로 설정
* (중요) `cfg`를 `1.0`으로 설정
* (선택 사항) `sampler`를 `lcm`으로 설정
* (선택 사항) `scheduler`를 `노멀(normal)`로 설정
6. `Run` 버튼을 클릭하거나 단축키 `Ctrl(cmd) + Enter`를 사용하여 이미지 생성을 실행합니다.
## 기타 관련 자료
### GGUF 버전 모델
* [HiDream-I1-Full-gguf](https://huggingface.co/city96/HiDream-I1-Full-gguf)
* [HiDream-I1-Dev-gguf](https://huggingface.co/city96/HiDream-I1-Dev-gguf)
City96의 [ComfyUI-GGUF](https://github.com/city96/ComfyUI-GGUF)에서 “Unet Loader (GGUF)” 노드를 사용해 “Load Diffusion Model” 노드를 대체해야 합니다.
### NF4 버전 모델
* [HiDream-I1-nf4](https://github.com/hykilpikonna/HiDream-I1-nf4)
* [ComfyUI-HiDream-Sampler](https://github.com/SanDiegoDude/ComfyUI-HiDream-Sampler) 노드를 사용해 NF4 버전 모델을 활용하세요.
워크플로 실행을 단계별로 완료하세요.
1. `Load Diffusion Model` 노드가 `hidream_i1_fast_fp8.safetensors` 파일을 사용하는지 확인합니다.
2. `QuadrupleCLIPLoader`의 네 개 해당 텍스트 인코더가 올바르게 로드되었는지 확인합니다.
* clip\_l\_hidream.safetensors
* clip\_g\_hidream.safetensors
* t5xxl\_fp8\_e4m3fn\_scaled.safetensors
* llama\_3.1\_8b\_instruct\_fp8\_scaled.safetensors
3. `Load VAE` 노드가 `ae.safetensors` 파일을 사용하는지 확인합니다.
4. **fast** 버전의 경우 `ModelSamplingSD3`에서 `shift` 매개변수를 `3.0`으로 설정해야 합니다.
5. `Ksampler` 노드의 경우 다음 설정을 해야 합니다.
* `steps`를 `16`으로 설정
* (중요) `cfg`를 `1.0`으로 설정
* (선택 사항) `sampler`를 `lcm`으로 설정
* (선택 사항) `scheduler`를 `노멀(normal)`로 설정
6. `Run` 버튼을 클릭하거나 단축키 `Ctrl(cmd) + Enter`를 사용하여 이미지 생성을 실행합니다.
## 기타 관련 자료
### GGUF 버전 모델
* [HiDream-I1-Full-gguf](https://huggingface.co/city96/HiDream-I1-Full-gguf)
* [HiDream-I1-Dev-gguf](https://huggingface.co/city96/HiDream-I1-Dev-gguf)
City96의 [ComfyUI-GGUF](https://github.com/city96/ComfyUI-GGUF)에서 “Unet Loader (GGUF)” 노드를 사용해 “Load Diffusion Model” 노드를 대체해야 합니다.
### NF4 버전 모델
* [HiDream-I1-nf4](https://github.com/hykilpikonna/HiDream-I1-nf4)
* [ComfyUI-HiDream-Sampler](https://github.com/SanDiegoDude/ComfyUI-HiDream-Sampler) 노드를 사용해 NF4 버전 모델을 활용하세요.